10-Inch Collapsible Dobsonian Telescope Guide & Tips

10″ Collapsible Dobsonian Telescope: Big Aperture, Smaller Footprint
A 10-inch Dobsonian is a classic choice for deep-sky brightness and satisfying planetary detail without the complexity of computerized mounts. A collapsible design keeps the same light-gathering power while making storage and transport more practical for apartments, smaller cars, and quick backyard sessions.
What a Collapsible Dobsonian Is (and What It Isn’t)
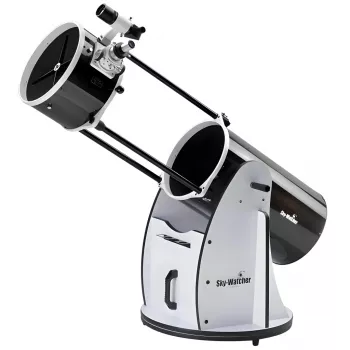
A collapsible Dobsonian combines a straightforward, observer-friendly mount with an extendable optical tube. The goal is simple: keep the performance of a full-size 10-inch reflector while reducing the telescope’s packed length.
- Alt-az Dobsonian base: smooth up/down and left/right motion designed for visual observing.
- Collapsible tube: the optical path extends for use and compresses for moving or storing; it does not reduce aperture when deployed.
- Best suited to visual astronomy: astrophotography is possible only in limited forms (Moon/planets with short video captures) because the mount is not equatorial.
Key Benefits of the Collapsible Design
- Easier transport: a shorter packed length fits more vehicles and doorways, especially when carrying in two pieces (tube + base).
- Faster storage: takes up less room in closets or corners compared with a full-length solid tube.
- Thermal behavior: open/extendable structures often cool faster than fully enclosed tubes, helping the mirror reach ambient temperature sooner.
- Comfortable observing: pairs well with an adjustable chair; the eyepiece height remains manageable for most adults even near the zenith.
10 Inches of Aperture: What It Delivers at the Eyepiece
A 10-inch mirror gathers a lot of light, which is the core reason Dobsonians remain a favorite for visual astronomy. Under dark skies, faint targets become more than “smudges,” and under suburban skies, brighter showpieces still pop—especially clusters, double stars, and the Moon.
- Deep-sky reach: more light means brighter nebulae and better galaxy structure under dark skies.
- Resolution potential: larger aperture supports higher magnification when atmospheric seeing cooperates.
- Planetary detail: improved contrast and fine features on Jupiter and Saturn become easier to hold steadily with good collimation and cooldown.
- Moon viewing: crisp crater edges and rille detail at moderate-to-high magnification; a neutral density or variable polarizing filter can improve comfort.
Aperture and real-world observing expectations
| What changes | What to expect with 10″ | What still limits performance |
|---|---|---|
| Brightness on faint targets | Noticeably brighter nebulae and globular clusters; more stars resolved in clusters | Light pollution and transparency |
| Useful magnification range | Frequent use around ~100–250x; higher on steady nights | Atmospheric seeing; optical alignment |
| Detail and sharpness | More fine structure possible on planets and lunar features | Cooldown time; collimation accuracy |
| Field of view | Wide-field possible with suitable eyepieces, but not as wide as short refractors | Focal length and eyepiece design |
Setup Checklist for a Smooth First Night
A 10-inch Dobsonian is refreshingly direct, but a few small habits make the first night more successful and the views noticeably sharper.
- Carry and assemble: place the base on firm ground, then mount the optical tube securely before extending the collapsible section fully.
- Balance check: with the finder and eyepiece installed, verify the tube stays put when released; adjust accessories or tension as needed.
- Collimation essentials: a simple collimation cap or Cheshire tool is usually enough; re-check after transport.
- Cooldown: allow time for the primary mirror to reach ambient temperature for best sharpness; a gentle fan (if included) can help.
- Finder alignment: align the finder on a distant terrestrial object before dark to make star-hopping easier.
For a quick primer on what’s visible season to season, NASA’s night-sky resources are a helpful starting point: NASA Science.
Using It Well: Star-Hopping, Eyepiece Choices, and Targets
The Dobsonian “sweet spot” is hands-on observing: sweeping, nudging, and learning the sky. A planisphere or a beginner-friendly observing guide can shorten the learning curve, and a simple routine keeps sessions flowing.
- Start with low power: a longer focal-length eyepiece makes locating targets easier and frames larger objects.
- Step up gradually: increase magnification only when the image remains crisp; back down if it gets soft or dim.
- Suggested observing flow: Moon at dusk, bright planets next, then clusters and nebulae as darkness deepens.
- Helpful accessories: a red flashlight, a planisphere or sky app, dew control for humid nights, and an adjustable observing chair.
- Expectations by location: under city lights, focus on the Moon, planets, double stars, and brighter clusters; under dark skies, nebulae and galaxies become standout targets.
For practical observing guides and equipment basics, Sky & Telescope is a long-running, reliable reference. If backyard lighting is the main obstacle, the International Dark-Sky Association offers useful context on light pollution and how it affects contrast.
Care, Storage, and Long-Term Reliability
When a 10″ Collapsible Dobsonian Makes the Most Sense
In-Stock Picks
- 10″ Collapsible Dobsonian Telescope
- Simple AI-Powered Relaxation You Can Feel | AI Breathing Exercises for Relaxation | Digital Guide for Daily Calm and Stress Relief
- AI’s Blind Spots | Digital Guide to Understanding the Limits, Biases, and Boundaries of Artificial Intelligence
FAQ
Does a collapsible Dobsonian need collimation every time it’s used?
It should be checked after transport or big temperature shifts, and minor tweaks are common. With a simple cap, Cheshire, or laser, the process is usually quick once you’ve done it a few times.
Can a 10-inch Dobsonian be used for astrophotography?
It excels for visual observing, and it can work well for lunar and planetary imaging using short video captures. Long-exposure deep-sky imaging is limited because an alt-az Dobsonian mount doesn’t track like an equatorial system.
How long should the telescope cool down before high magnification?
A practical range is often 30–90 minutes depending on how big the temperature difference is between indoors and outdoors. Fans and smaller temperature gaps reduce the time, and a steadier, sharper star image is a good sign the optics are ready.





Leave a comment